Popups in Quality Window are structured lists of predefined values used to standardize data entry and improve consistency.
They help users enter data faster while eliminating spelling variations and inconsistent naming, which improves reporting and analysis.
Popups can be configured as either single-level or multi-level depending on the complexity of the data being captured.

Why Use Popups
Popups are useful when:
- You want to standardize user input
- Data must be selected from predefined options
- Consistency is important for reporting and analysis
- You want to guide users through structured data entry
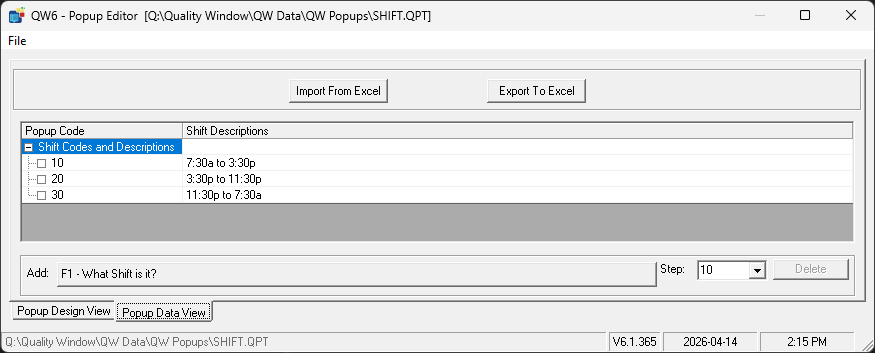
Single-Level Popups
A single-level popup presents a simple list of selectable values.
Each entry consists of:
- A numeric key (for example 10, 20, 30)
- A corresponding label or description
Users select a value from the list, and once selected, the system moves them to the next field.
This is best suited for:
- Simple classifications
- Yes/No or limited option fields
- Independent selections with no dependencies
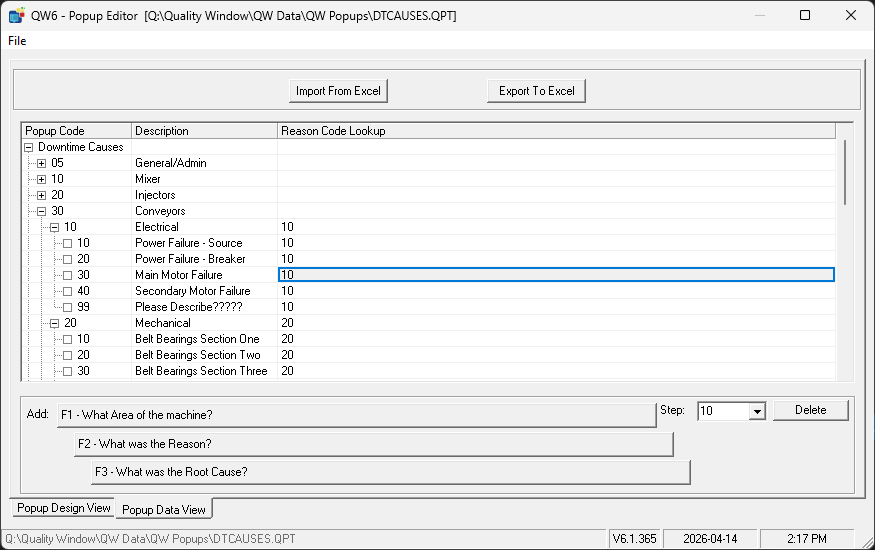
Multi-Level Popups
A multi-level popup is used when selections depend on previous choices.
Each level filters the next, guiding the user through a structured selection process. Quality Window supports up to 9 levels.
Multi-level popups do not need to be fully balanced. Some branches can end earlier than others, allowing flexibility based on how much detail is required.
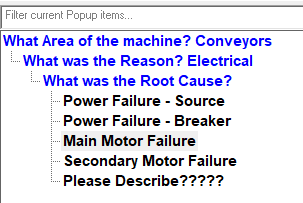
For example, in a downtime application:
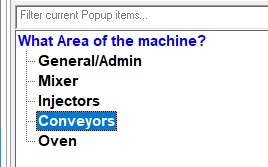
Level 1 – Area
- Mixers
- Injectors
- Conveyors
- Oven
- Other
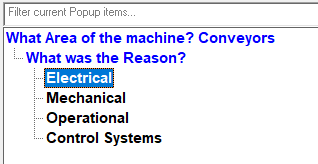
Level 2 – Reason (dependent on Area)
- Electrical
- Mechanical
- Operational
- Control Systems
- Other
Level 3 – Cause (dependent on Area and Reason)
- Power Failure – source
- Power Failure – breaker
- Main Motor Failure
- Secondary Motor Failure
- Other
This structure ensures users only see relevant options at each step while allowing some paths to be more detailed than others.
Why Use Multi-Level Instead of Multiple Single-Level Popups
Multi-level popups improve both speed and accuracy.
- Users only see relevant options based on prior selections
- Data entry is faster due to reduced list size
- Invalid combinations are prevented
For example, a multi-level popup prevents mismatched selections like:
Conveyor → Electrical → Main Motor Failure
By contrast, multiple independent popups would allow invalid combinations and require users to scan larger lists.
Important Behavior for Multi-Level Popups
- Multi-level popups do not need to be fully balanced
- Records are not required to extend to the lowest level
- Each level controls the available selections for the next level where defined
Popup Variables vs Lookup Variables
Once a popup is defined, it is used in an application through Popup variables or Lookup variables. While both use the same popup file, they behave differently.
Popup variables:
- Allow the user to select a value directly from the popup
- Typically represent the primary selection (for example Area, Reason, or Cause)
- Display the value from the selected popup level
Lookup variables:
- Reference a Popup variable
- Automatically display related data based on the selected popup value
- Can display values from other levels or additional fields (columns) in the popup
- Can be used to normalize PLC or external system codes into meaningful text by matching the popup key to the incoming value
This allows you to create richer data entry experiences without requiring additional user input.
For example:
- Popup variable = Cause
- Lookup variable = Description, Category, or related attribute tied to that cause
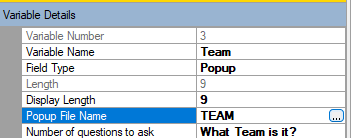
Popup Variable Behavior
Popup and lookup variables have some important behaviors:
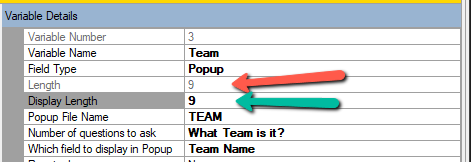
- The variable length is automatically sized based on the popup field being displayed
- You do not need to manually configure length to match popup values
- The displayed value is controlled by the popup configuration, not the variable definition
- Administrators can set a display length to control how wide the popup appears in the logsheet
Selecting Popup Levels
Popup and lookup variables can be configured via the Number of Questions to Ask property to display specific question levels of a multi-level popup.
For example, with a 3-level popup:
- A variable can be set to only capture Level 1 (Area)
- Another variable can capture Level 2 (Reason)
- Another variable can capture Level 3 (Cause)
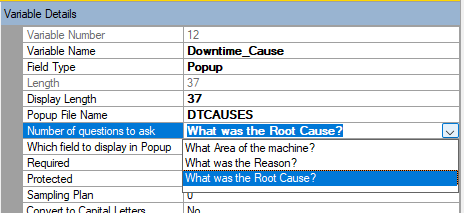
This allows flexibility in how much detail is required for a given application.
You are not required to expose all levels to the user.
Configuring the Popup Field to Display
Each popup entry can contain multiple fields (columns), such as a code, description, or category.
The Which Popup Field to Display in Popup setting controls which field is shown in the variable.
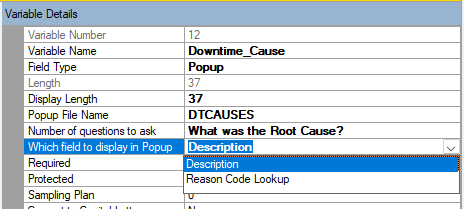
For example, a popup entry might contain:
- Key: 10
- Description: Conveyor
- Reason Code Lookup: 100023
Depending on configuration, the variable can display:
- The description (Conveyor)
- The Reason Code Lookup (100023)
- Or another defined field
This allows you to control whether users see:
- Short codes for compact data entry
- Full descriptions for clarity
- Or supporting information through lookup variables
This setting works together with:
- Popup levels (to control which level is used)
- Lookup variables (to display additional related fields)
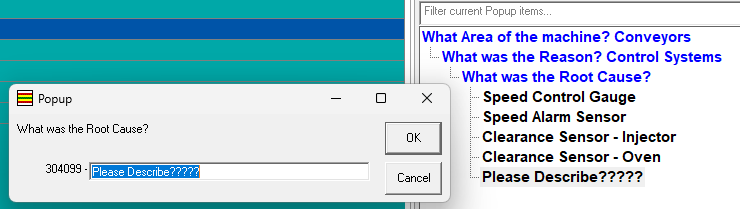
Using “99” Entries
Entries labeled with 99 behave differently than standard entries.
- Levels 01–98 are fixed selections
- Level 99 allows the user to enter a custom value
This is commonly used as an “Other” option.

Best practices:
- Include a 99 entry at the end of each level to allow flexibility
- Regularly review values entered under 99 to identify patterns
- Promote frequently used 99 entries into standard popup options to improve consistency over time
Sharing Popup Files
Popup files can be shared across users and applications.
To configure a popup file:
- Place the popup file in a shared folder accessible to users
- In QW Admin, open the application
- Select or create the popup/lookup variable
- In property editor, click the … option for the Popup Filename property to open the Popup selection dialogue.
- Select your folder and all popups stored in that location are displayed in list.
- *This dialogue can also be used to quickly create a new popup or edit an existing popup.
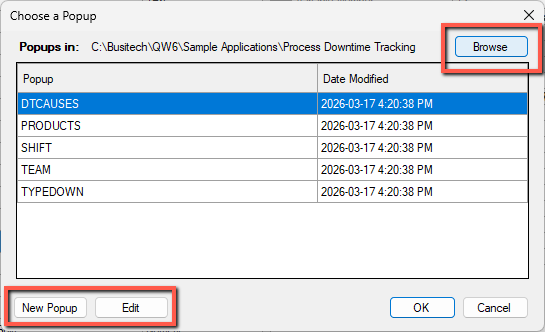
This allows multiple users and systems to reference the same standardized list.
Key Considerations
- Popups improve data quality by enforcing consistency
- Popup vs Lookup variables provide flexibility in how data is captured and displayed
- Multi-level popups guide users and prevent invalid combinations
- Popups can be unbalanced to match real-world processes
- Use 99 entries to allow controlled flexibility while maintaining structure
- Regular review of popup usage improves long-term data quality
- Shared popup files help maintain consistency across environments