A Quality Window downtime application helps you capture the details behind each downtime event. Just as important as recording the root cause is recording the actual duration of the event.
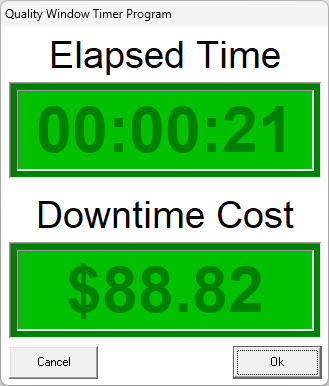
One practical way to improve downtime accuracy is to add a timer to the data entry process. With this setup, the operator starts a downtime event by pressing Add. Quality Window displays a timer window, and when the event ends, the operator clicks OK. The elapsed time is then written into the downtime record automatically.
This approach helps reduce estimated entries and gives you more reliable downtime data for analysis.
Why add a timer?
Without a timer, downtime duration is often entered from memory after the event is over. That can lead to inconsistent or estimated values.
By using a timer, you can collect more accurate data and improve how downtime is analyzed.
This gives you better visibility into:
- How often downtime events occur
- How long each downtime event lasts
- A third severity measure such as downtime cost, lost output, or efficiency impact
That third measure can be especially useful. Two problems may occur with the same frequency, but one may have a much greater business impact. Adding a severity value can help teams focus corrective action where it matters most.
Optional secondary counter
The example below uses a secondary counter called Downtime Cost. This value is displayed while the timer is running.
It does not need to be cost specifically. You could also use a time-based value such as:
- Cases not produced
- Units lost
- Estimated waste
- Another severity measure that can be calculated from elapsed time
As long as the value is based on duration, it can be used to add another layer of analysis to the event.
How it works
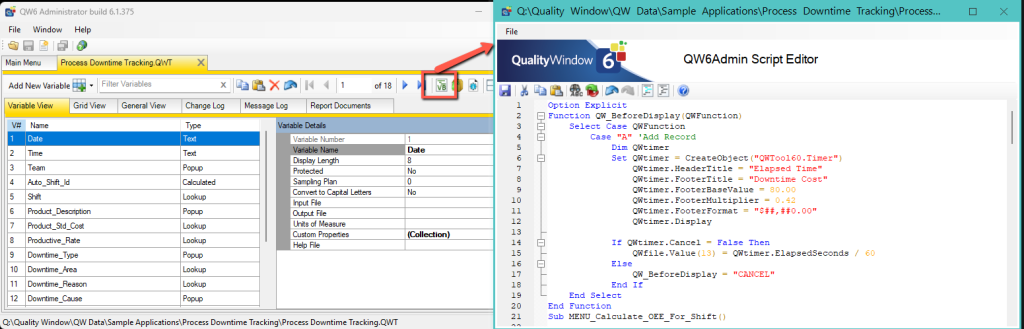
This solution uses the QW_BeforeDisplay user exit to intercept the Add action.
When the operator starts a new downtime record:
- The script detects the Add action
- A timer window is displayed
- The timer runs until the operator clicks OK
- The elapsed time is written into the downtime duration field
- If the timer is cancelled, the Add action is cancelled
Example script
Option Explicit
Function QW_BeforeDisplay(action)
Select Caseaction
Case "A" 'Add Record
Dim QWtimer
Set QWtimer = CreateObject("QWTool60.Timer")
QWtimer.HeaderTitle = "Elapsed Time"
QWtimer.FooterTitle = "Downtime Cost"
QWtimer.FooterBaseValue = 80.00
QWtimer.FooterMultiplier = 0.42
QWtimer.FooterFormat = "$##,##0.00"
QWtimer.Display
If QWtimer.Cancel = False Then
QWfile.Value(13) = QWtimer.ElapsedSeconds / 60
Else
QW_BeforeDisplay = "CANCEL"
End If
End Select
End Function
Downloads
Access ready-to-use resources to help you implement this timer in your own downtime application.
Timer Script (Standalone)
Download the script file used in this example. This can be added directly to your application script in QW Admin.
- Includes the timer logic for capturing elapsed time
- Pre-configured example for writing Minutes Down to a variable
- Can be adjusted to match your application structure
Sample Downtime Application
Download a working sample application that includes the timer already configured.
- Fully functional downtime application
- Timer integrated into the Add record workflow
- Example setup for duration and secondary value tracking
This is useful if you want to see how everything is wired together before applying it to your own application.
What the script is doing
QW_BeforeDisplay(action)
This user exit runs before the data entry screen is displayed.
The action parameter tells the script what operation the user is performing. It is passed in automatically by Quality Window and allows the script to respond differently depending on how the screen was opened.
Common action values include:
"A"→ Add a new record"E"→ Edit an existing record"I"→ Insert a record"C"→ Copy a record"D"→ Delete a record
By checking the value of action, you can control exactly when your logic runs.
Case "A"
This tells the script to run only when the operator starts a new record.
In this example, the timer is only needed when capturing a new downtime event, so the logic is limited to the Add action. This prevents the timer from appearing during Edit, Insert, Copy, or Delete actions.
CreateObject("QWtool.Timer")
This creates the timer object used to display the elapsed time window.
HeaderTitle
Sets the title shown at the top of the timer window.
FooterTitle
Sets the label for the secondary counter shown at the bottom of the timer window.
FooterBaseValue
Sets the starting value for the secondary counter.
FooterMultiplier
Sets the amount added over time while the timer runs.
FooterFormat
Controls how the secondary value is displayed.
QWFile.Value(13) = timer.ElapsedSeconds / 60
Writes the elapsed time into variable 13 as minutes.
QW_BeforeDisplay = "CANCEL"
Cancels the Add action if the operator closes the timer without confirming it.
Important setup notes
Update the variable number to match your application
In this example, the elapsed time is written to
QWFile.Value(9), which means variable 9 in the application.If your Minutes Down field is not variable 9, you must update that reference in the script.
This is especially important if variables have been inserted or reordered since the application was first created.
Recalculate any related severity value in the application
If you want to store a value such as Downtime Cost, it is best to calculate that value in the application itself as well.
That way, if the Minutes Down value is later edited, the related severity value can be recalculated correctly.
Where to add the script
If your application already has an application script, you can add this logic there.
If it does not, you can create one from the Script editor in QW Admin for that application.
When this approach makes sense
This is a good fit when:
- Operators start downtime events manually
- Duration is currently estimated after the fact
- You want better downtime duration accuracy
- You want to add a second severity measure tied to elapsed time
Related Resources
- How to deploy custom scripts in Quality Window
- Using the legacy Excel form macro in Quality Window
- Capturing data from multiple RS232 devices
- How to Use Shared Configuration in Quality Window
- Sample Applications in QW6
Need help?
While scripting is available to customers, most choose to work with Busitech to ensure the solution is designed and implemented correctly.
If you need help adapting this pattern to your own downtime application, contact Busitech Support or Sales.